Apple’s much awaited iOS 5 is finally here and the passing away of Steve Jobs is still being felt especially when you think about the iCloud thingy (Steve is up there somewhere in the clouds). This is a major iOS upgrade since Steve’s passing so naturally iPhone, iPod touch and iPad users scrambled to update their gadgets with the latest operating system. One thing I learnt from past experience is to pull out my check-list before performing the actual upgrade. Like it or not, there would be problems during the iOS upgrade – regardless whether it’s a minor or major upgrade.
As it turns out, tons of Apple fans hit problems during the upgrade process. Twitter chatter rooms were filled with screams from iOS upgrade error to data loss which includes applications, music, photos and whatnot. It was a disaster and people started to swear and cry and whine for Steve Jobs, literally. Sensing a massive traffic, Apple made iTunes 10.5 available on Wednesday, a day ahead of iOS 5’s release, but that didn’t stop onslaught to their servers. Apple support forum, facebook, twitter were swarmed with reports about difficulties in downloading the iOS, error message 3200, failed updates, server unavailable etc.
Now, I mentioned the important of check-list prior to upgrade. The check-list consists of some simple steps to be taken before you perform the actual upgrade. And I developed this check-list based on trial-and-error simply because when I hit problems during the previous minor iOS upgrade, there was no clear solution to it. So my preventive steps may or may not work for everybody. So here’re what I did:
- iOS 5 requires iTunes 10.5 so go “Check for Updates” to get it updated
- Once your iTunes is updated, connect you device to your PC or Mac to start downloading the iOS 5 – choose “Download Only” and not “Download and Update” (we’ll get to the update part later)
- Unplug whatever USB connections you have such as portable disks or pendrives
- Reboot your PC or Mac and disable your firewall (such as ZoneAlarm)
I’m not sure but my previous minor iOS upgrade was a disaster as it failed half-way leaving my iPhone “stuck” in restoration mode. No matter how I restore from factory settings or press and hold sleep & wake button, it won’t work – until I discovered I actually need to unplug those USB connections, reboot and disable firewall. And using the same check-list and to-do, I managed to upgrade my iPhone from iOS 4.3 to iOS 5 without major problems. There’re minor problems though which I’m going to talk about later but as of now, let’s get ready to upgrade your piece of lovely iPhone, iPad or iPod touch.
Step-1:
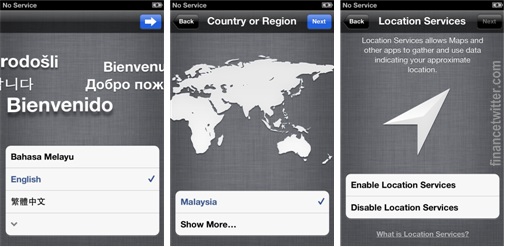
- Connect your device to your PC or Mac. iTunes would prompt to update iOS 5
- Once iOS 5 is installed, you would be navigating some screens to setup your device such as the “language” preferance, which “country” you plan to retire (kidding) and whether you wish to enable “location services” so that Steve Jobs can pay you a visit (again, just kidding).
Step-2:
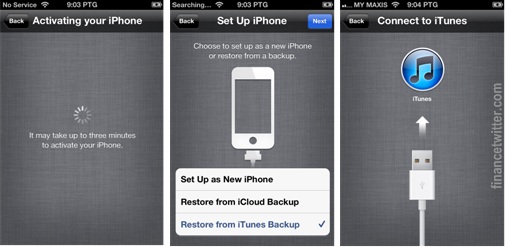
- Your iPhone would take some time to activate your device
- It would then prompts you if you wish to set up your device as new iPhone or perform restoration, either from iCloud or iTunes Backup – obviously your answer is to restore from iTunes Backup.
- Connect your device to PC to start restoration.
Step-3:
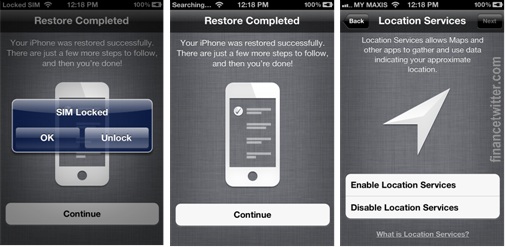
- Once restoration is completed, a nice screen would prompt you to unlock SIM.
- The interface was polite enough to inform you that despite successful restoration, there’re still some steps to be taken before you can go to toilet to answer nature’s call *grin*.
- Again, it will ask whether you wish to enable location services.
Step-4:
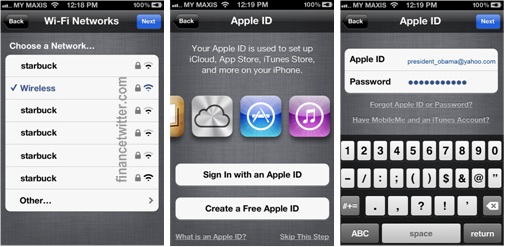
- Since iCloud is all about PC-less concept, naturally it will ask you to choose WI-FI connection to use (prompt for password if it’s secured WI-FI).
- The next screen prompts for Apple ID to set up iCloud so choose “Sign in with an Apple ID” since you would have such ID already. Type your password to proceed and press “Next” to proceed.
Step-5:
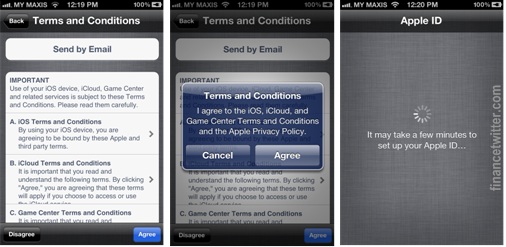
- Screens about “Terms and Conditions” would appear and you’ve no other choice but to agree
- It will take some minutes to set up your Apple ID
Step-6:
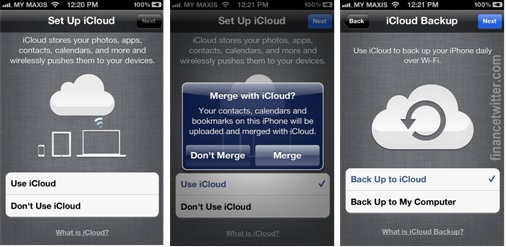
- Next, you need to choose whether to use iCloud or otherwise from the “Set Up iCloud” screen.
- Choose “Use iCloud” to proceed. Actually if you choose not to use it, you still can change the setting later on.
- Choose “Merge” when it asks whether you like to merge your contacts, calendars and bookmarks.
- The next screen – if you wish to use iCloud Backup. Again, you can change this setting from your iPhone – it’s not permanent so don’t fret.
Step-7:
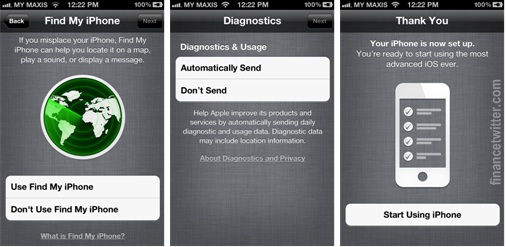
- Choose if you wish to enable “Find My iPhone” feature, in case you dropped it inside toilet bowl.
- The next screen asks if you wish to automatically send diagnostic and usage data to Apple Inc. Although the reason was noble, I never trust vendors to play around with my information so I normally “do not” allow such feature.
- Your iPhone is now set up and you can start using your phone, at last.
However, if you’ve tons of applications prior to the iOS 5 upgrade, you’ll notice the iTunes is still performing “Restoration”. So, if you were to flick around your iPhone after the iOS 5 set up, you’ll notice lots of the applications are “lost”. Before you start dialing for the nearest police station, take note that the latest iOS is smart enough to perform real-time applications restoration while letting you use your iPhone. You would notice a tiny “recycling” icon on top of your iPhone screen – it’s actually doing the task of application restoration.
Also, you won’t be able to get the exact icons or folders arrangement after the full applications restoration. You would probably notice your application icons scattered all around so you’ve to re-arrange it into folders (if you wish to). Maybe this was intentionally designed to force you to perform housekeeping – whatever apps not used for centuries should be discarded or removed. And if you discover that all your photos, songs and videos are gone, it’s because the restoration of photos and videos are done last so be patience. In iOS 5, songs and videos are separated into “Music” and “Videos” respectively.
I’ve to admit iOS 5 is pretty cool especially with the iCloud and the more than 200 new features or improvements. With the new iOS, you can also know the data usage per application of which you can’t determine in the previous iOS – which is important when you hit the threshold of data storage. Most importantly, you can now sync between your iPhone, iPad or iPod touch with your PC seamlessly via shared Wi-Fi. So, in case you lost your cable or mysteriously left it somewhere else, you can still sync your latest data. Capturing photo is also easier and faster – imagine some crooks or bullies try to do something funny – you can flash your iPhone and snap their photos with lightning speed *cool*.
Other Articles That May Interest You …
- Tributes To Steve Jobs, Record Tweets & Cool Cartoons
- Steve Jobs, 56, Edison of 21st Century, Has Died
- Folks, No iPhone 5, Only iPhone 4S and 3GS is FREE
- Apple CEO Steve Jobs Resigned, Is He Dying?
- How Did Some Great Companies Get Their Cool Names?
- Apple, Most Valuable Brand – Little Secret Of Its Dictator
- Obama Dinner – Steve Jobs, Mark Zuckerberg are VVIP

|
|
October 13th, 2011 by financetwitter
|


|

|

|

|

|

|




is this work on iphone 2g?